

Hi! Are you a space enthusiast? If yes then hi-fi! I love space and astronomy. Obviously, I'm no astronaut to go up there and have a closer look at the universe. But every time I find out that a person from earth has traveled to the sky, I get inspired to explore more. If you're like me, then here's something that will keep you inspired all the time.
Presenting, Cosmo Clock! It's a clock that can show the time! Yeah, I know, there's nothing special in that. But the special feature is in its glowing ring. It changes color every time an astronaut enters space! How cool is that? Just imagine you have this clock next to your desk every day and one morning you wake up to see its color changed. You will instantly know that another person just went up there!
What's more? The glowing ring isn't broken just to make it look cool. It's a Morse code! What does it say? Well, I'll let you figure that out ;)
Guess what? It's pretty easy to build. So let's get making!
Supplies
Nodemcu (esp8266) https://www.amazon.com/AZDelivery-Nodemcu-Module-E...
Female - Female jumper wires https://www.amazon.com/LANDZO-Multicolored-Breadbo...
1x Commom cathode RGB LED https://www.amazon.com/Stayhome-Cathode-Tricolor-E...
Enclosure for the clock (can be 3D printed)
Clock module
5v USB power supply https://www.amazon.com/Travel-Charger-Adapter-Sams...
Step 1: Making It Tik
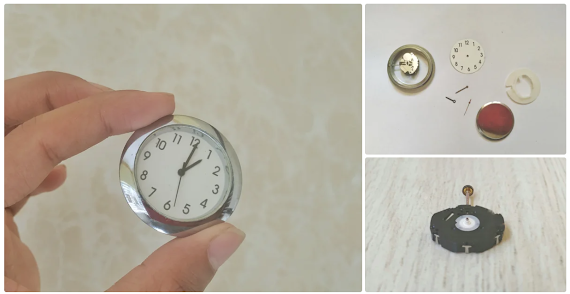
You can use any clock module for this. I've used one from a watch because it's smaller and can fit easily inside the casing.
Since I'm going to make the clock black, its arms need to be white. So I removed the existing arms and replaced them with the ones I made myself.

It's simple, I just cut out two strips of thin white plastic from an old container and shaped them like long triangles. Then I made holes in the end taking care of its size so that each one can fit into its respective part on the clock module. I didn't attach a seconds hand because I wanted it to look modern and minimal.
I would recommend using metal instead of plastic because it will be thinner and getting the holes right will be easier.
Step 2: The Chassis

Now let's make the enclosure of the clock. I'll call it chassis because it sounds cool.
If you have a 3D printer, it should be a piece of cake. You can just print the cake out. Uh, I mean you can print the chassis out. It's basically a hollow cylinder with one side closed. What about the height? It can be just a little taller than the height of the Nodemcu when it's standing on the pins. But I don't have a 3D printer. Neither can I go outside to buy something, because there's a lockdown in our country. So I went to the kitchen and found a container whose plastic lid was exactly like what I was looking for. Perfect.

Then you need to decide what the Morse coded text on your clock should say. Once I decided what mine should be, I found a Morse code converter online and typed "sky" and got its Morse code. Oops. I wasn't supposed to reveal that.
Then I cut out strips of black card paper of two different widths. The space between two letters should be larger than the space between dashes and dots of a single letter. These spaces are where the strips of card paper should be stuck. I first made markings using a marker and used adhesive to stick the strips accordingly. Then, I cut a long strip and stuck to the side of the chassis and a circle on top, making sure to leave enough space around it for light to come out.
Step 3: Electronics

The hero of the show is a Nodemcu board. We use Nodemcu instead of an Arduino because it has wifi capabilities which we are going to use to receive data when an astronaut enters space.
The connections are pretty simple. All you have to do is connect the RGB LED as shown in the circuit diagram. Then short D1 to D3 and D2 to D4.
Step 4: Setup Blynk


To trigger the pins of our Nodemcu from the internet, we need an app called blynk
Create a new project. An Auth token will be mailed to you. We'll use this token in the next step.
Tap on the "+" and add a Button from the widget box. In the button settings (which you can open by tapping on the button), select the PIN as "GP2" and slide the toggle towards "switch".
Repeat the steps to create another button with PIN as "GP0"
Step 5: Setup IFTTT


This is the service that will let us know when an astronaut is going to space. You can use the website or it's android or IOS app. Follow the steps in the pictures above.
On IFTTT, click on "get more". Now click on + and then click on "this". Then search for and select "space". Then click on "astronaut enters space".
Now click on "that" and search for "webhooks" on the search bar. Click on "make a web request" and enter the URL. The URL format is https://IP/Auth/update/D2
Replace Auth with the Auth token of the blynk project and IP with blynk cloud IP of your country. To get the IP, open command prompt and type "ping blynk-cloud.com". For India, the IP is 188.166.206.43
Select "put" in the method section and select "application/json" in the content type. In the body, type ["1"].
Now we're going to add another trigger to make sure our clock turns off when we're sleeping. This part is optional, but it’s a good idea to do this, because it saves power.
Click on +, select "this" and select "date and time". Select "Every day at" and set the time you wake up. Then repeat the steps for webhooks as above. This time the URL is https://IP/Auth/update/D0.
Repeat the steps and create another trigger for the time you go to sleep and this time type ["0"] in the body. Because we're turning it off at night.
Phew.. That was a lot of work. But everything is now setup and you're good to go.
Step 6: Program
Programming the Nodemcu is simple since we've done most of the work in blynk and ifttt. The good news is, I've attached the program in this step which you can upload to your project. Before you minimise this tab to upload your program, just read ahead. You will need to make a few changes.
You have to add your wifi ssid and password in the program where it says 'YourNetworkName' and 'YourPassword'. Also the 'YourAuthToken' should be replaced with the auth token you received from blynk. Yes that's all, now you can go and upload the code.
I'll mention a few things about how the code works. It's pretty simple. It's just reading the state of D2 which is coupled with D4 (gpio 2) that gets triggered from ifttt when an astronaut enters space. Once it's triggered, it generates a random number between 0 and 255 for each colour. These random numbers will provide a random colour to the RGB LED. Similarly the D1 is coupled to D3 (gpio 0) which turns off the LED at the time you've set in ifttt. The default colour of the LED is set to blue
Download the code: https://content.instructables.com/ORIG/FVI/IY0F/K9R2MDEY/FVIIY0FK9R2MDEY.ino
Step 7: Assembly


0 Comments